How to use Robolytix module in Drupal
Robolytix is the key online analytic and monitoring tool for Robotic Process Automation using Sonar technology to evaluate, audit, monitor and improve performance of robots operating on any application or RPA platform. This tutorial will guide you to analyze your processes in Drupal content management system.
Drupal is a content management software. It's used to make many of the websites and applications you use every day. Drupal has great standard features, like easy content authoring, reliable performance, and excellent security. But what sets it apart is its flexibility; modularity is one of its core principles. Its tools help you build the versatile, structured content that dynamic web experiences need. Robolytix module Robolytix can add Sonars to content moderation states.
Prerequisites
To use Robolytix with Drupal, it is necessary to have a Robolytix account. If you do not have one, you can create the account at Robolytix.com and make basic settings using the onboarding wizard.
1. Video Tutorial
If you want to see full featured settings with examples, see detailed How to use Robolytix module in Drupal.
2. Robolytix module installation
The Robolytix module for Drupal is available at https://www.drupal.org/project/robolytix. The module can be installed via Drupal user interface or via composer.
Installation via Drupal user interface
Go to that Robolytix module's page then copy the "tar.gz" link under the Downloads section at the bottom of that page.
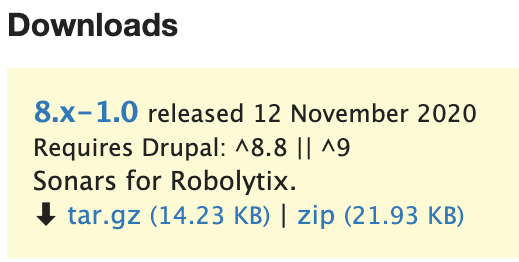
Then paste that link on your site at /admin/modules/install in the URL box, then press Install.
Finally enable the module at /admin/modules/ page.
Installation via composer
Install Robolytix module via ‘composer require drupal/robolytix’, then enable the Robolytix module at /admin/modules/ page.
3. Connecting the Robolytix service to Drupal CMS
At /admin/config/system/robolytix, you are asked to provide Robolytix API key. You can obtain that key in the Robolytix service.
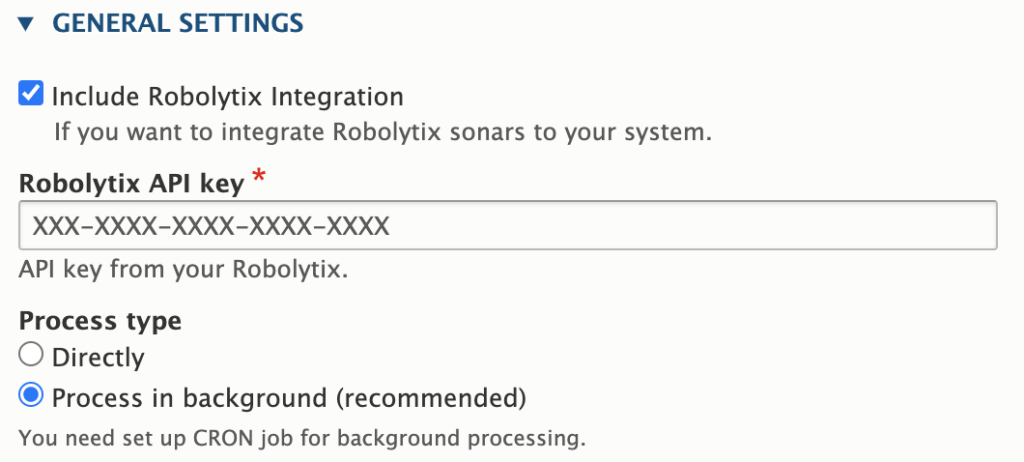
You can also set the process type of your sonars.
- Directly: The data is sent to the Robolytix service straight away.
- Process in the background: The data is sent by background worker on CRON run. This is the recommended option, but the CRON must be set up in your Drupal. It can guarantee that the Sonar was sent correctly.
4. Use Sonars in Drupal
Firstly create your process in the Robolytix service.
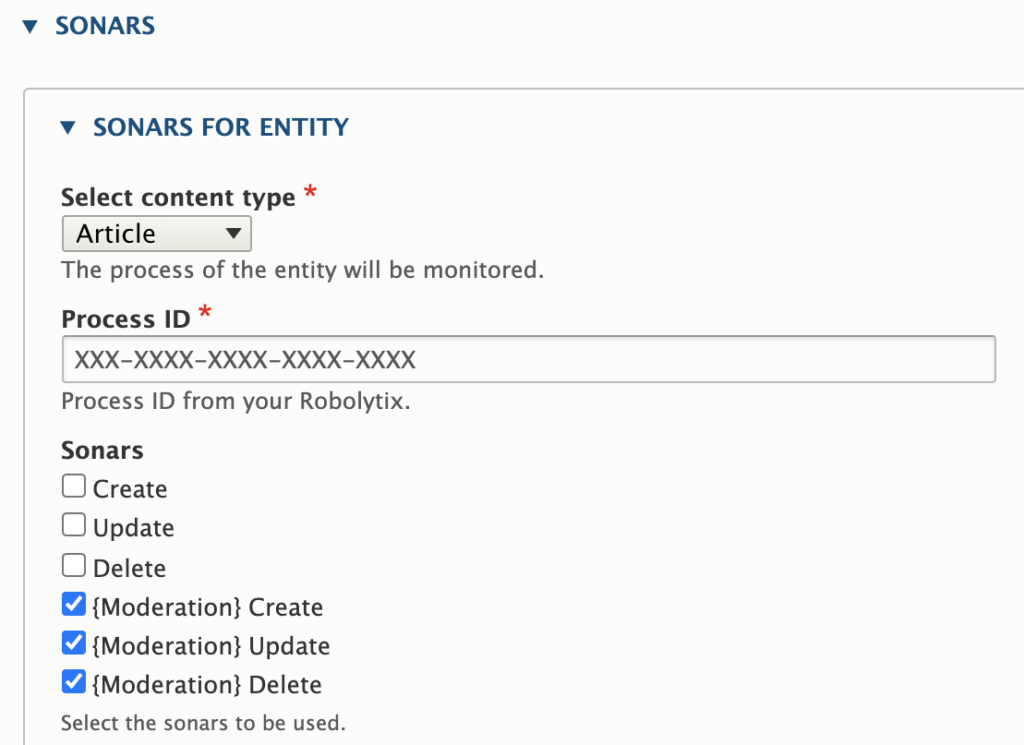
Add a Sonar in Drupal user interface
Go to /admin/config/system/robolytix, there you can map your Robolytix process to node’s content moderation. Sonars can be added to the operations: create, update, delete. The end sonar is automatically sent when the node is published.
If you use the ‘Content moderation’ module there are also available Sonars for moderation states
Add a Sonar programatically
The Sonars can be easily added to any hooks:
$robolytix = \Drupal::service('robolytix.robolytix_api');
$event = new \Drupal\robolytix\Event\SonarEvent('processId', 'sonarName', 'sonarType', 'runId', 'message');
$robolytix->processSonar($event);
If you have questions or need help with implementation please contact us at support@robolytix.com. There is also a Support Forum for further questions.


Stay in touch